How to quickly set up a new gaming PC with Windows 10
If you haven’t installed Windows lately, you may remember it as a frustrating ordeal.

If you haven’t installed Windows lately, you may remember it as a frustrating ordeal. But things have changed since the optical drive era, and installing Windows 10 is faster and smoother than it was even a few years ago with Windows 7. With a bit of prep and a quick flash drive or two, you can be cruising with Microsoft’s new OS on your new rig less than an hour after you click the install button.
Here's the fastest way to get Windows 10 installed on a new gaming rig.
All you need

Fast drives at 16+ GB will make your installation easier.
Pick a pair of speedy sticks
You’ll need media to install from, and USB flash drives are the perfect choice. Pick two in USB 3 flavor and get the fastest ones you can. It makes a difference during installation. It’s also smart to shoot for larger sizes, at least 16 GB. While the OS files themselves don’t take up much space, there will be other important uses for those free gigabytes before installation is over. The Lexar drivesused here clock in with a real-world 50 MB/s read speed and run $25 a pair, although they are bit on the fragile side.
Start with software
You won’t need to find Windows 10 installation media or get a retail product from a store; Microsoft offers a media creation tool via free download directly on their website, which creates an installer for you. Grab the version compatible with your system and, this is important, have your Win10 product key ready, as you’ll be entering it in eventually.
A note for those upgrading: If you don’t already have a product key and plan on using Microsoft’s free upgrade offer, you are required to install Win10 over an already existing and activated previous Windows version to obtain the key you’ll need for bare installations like the one we’re doing here . The version of Windows you can pick for the free upgrade is based on what you were running beforehand. Systems running Win 7 or 8 Pro and Ultimate versions can pick Windows 10 Pro, while everyone else gets Win 10 Home. Cumbersome and a little confusing, but you can’t complain about the cost!
To get your free upgrade on a brand new rig, install Windows 7 or 8 first, using your existing product key. Then you can follow the steps below. If you need the Windows 7 installer, download it here. Download the Windows 8.1 media creation tool here.

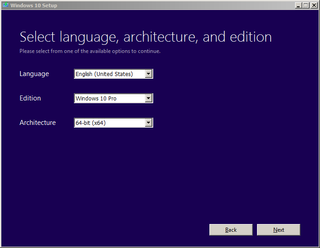
Select “Create installation media for another PC” and click “Next.” Language, edition and architecture options follow. Pick the appropriate edition for your product key and stick with 64-bit variants unless you absolutely require 32-bit for legacy reasons. Some games, such as Cities: Skylines, require 64-bit Windows versions to run while others need more than the 4 GB of memory allowed on 32-bit versions of Windows.

Picking the right media type on the next screen is less obvious than it seems, as there are merits to both direct USB installer creation and the more flexible Win10 ISO images. The flash drive method is usually the best way to go, but if your system has problems booting with them, there are speedy alternatives using the ISO and third party utilities like Rufus, which offers a wider variety of options for creating bootable USB media. The ISO version also comes in handy when installing Windows 10 to a virtual machine for a test drive using software like VirtualBox.

Select the USB flash drive option and pick the attached device you’ll be using as the installer. While the installer itself is less than 5 GB, the extra space will come in handy for the next step. For now, the media creation tool will format the flash drive, download and transfer the installer, and make the USB bootable.

Driver Directions
The first use for that extra space is a folder housing all the drivers for the motherboard, graphics card and whatever other components you have installed, along with a few choice utilities to keep handy on any system.
Avoid using any drivers that shipped with your hardware, and download the newest version from the manufacturer instead. Otherwise you may end up installing them all over again. The software that comes inside the box with most hardware is usually outdated before it leaves the factory.

Go to the manufacturer’s website and find the product support page for your hardware and operating system, then download all relevant files for your system. Since these are probably compressed, do your future-self a favor and decompress them now into logically named folders you’ll be able to read at a glance. Folders with names like APRP_Win7-8-8-1_V10028 aren’t very helpful.
While you should install all the necessary drivers for your system, you don’t need to install all the software available for every component. Many manufacturers include optional, bloated versions of their drivers, third-party utilities and other extras that aren’t required for operation and occasionally cause trouble. Keep your system lean and mean by avoiding software kruft and fluff.
Tools for the road
That said, there are a few tools no new system should be without. Include installers for your preferred virus scanner, malware protection, system information utility, and any third party browsersyou use. It’s smart to have all of these in place before connecting a new system to any internet-aware networks. You also might consider a benchmarkor twofor quick system tests to make sure everything is running properly.
Once you’re done, a 32 GB drive will be about a third to halfway full. As usual with Windows, there’ll be more space devoted to drivers, utilities and updates than to the operating system itself. Having all this at your fingertips during the initial install is one reason why it pays to prep beforehand.
Time to drop the dime, aka installing Win 10
Now that your speedy flash drive is packed full of Win 10 goodness, it’s time for installation. Don’t worry, it won’t take long. Plug the drive into a USB 3 port and restart your rig into BIOS. Arrange the boot order so that UEFI mode USB comes first, and while you’re here, check to make sure you’ve got the latest BIOS version and the target drive is recognized and ready for OS installation. Since the latest BIOS is already downloaded and uncompressed on the flash drive, this should be a piece of cake. When you’re done, restart and the system will boot into the Win 10 installer. Select your language, click Next, and start the installation.

At this point you’ll be prompted for your Product Key. Enter it or click Skip if you prefer to do this later. Keep in mind that you’ll be running an unactivated version of Windows if you install without the product key, and some features will be disabled.

Next up is installation type. You can either install over an existing version of windows and keep your settings, or go for a clean install with the Custom option. For a new system you’ll be picking Custom, but don’t forget to use Upgrade first if you’re redeeming the free Win 10 offer.
You’ll need to pick the target drive where Windows 10 will be installed, and there’s the usual set of drive tools available to assist, including deleting, formatting and extended partition options. In most cases, it’s best to start with unallocated space on a bare drive and let Windows perform the partitioning during installation. Once you’ve selected the drive, click Next and Win10 will finish the initial installation, reporting progress via the status screen.

Once the installer is finished, you’ll be presented with the Express settings screen. Even if you’re in a rush, take a moment and pick Customize settings anyway, since there’s plenty here you’ll want to know about, including a lot of phone-home options Microsoft leaves on by default. It’s a good idea to review these, even if you intend to leave them on.

Options include location, advertising ID, browser page prediction, error reporting and the now infamous automatic network connectivity settings. My recommendation is to turn all of these options off unless you have a specific reason to leave them on. There’s little to gain by sharing this information with Microsoft or people on your contact list.

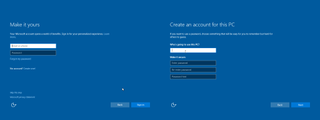
The last part of the customization process is picking your sign-in method, usernames and password. Since Windows 8, Microsoft has provided an online, Google-like sign-in ID that ties together Office, Outlook, OneDrive and other functions with your Windows username, but you can also skip this and create a standard local account as well.

After a few moments configuring apps and settings, the system will boot to the new Win 10 desktop. You’ll notice a few changes immediately, like the new Start Menu and search bar, while others will reveal themselves as you browse deeper into the control panel and other areas.
Now it’s time for the final step. Copy the driver folder from the USB flash drive to your local disk and start installing your drivers. Begin with the motherboard’s chipset drivers and prioritize other low-level, high-function software such as graphics cards and storage controller drivers, before going on to utilities and tools. After some clicking and a reboot or two, you’ll be done. Welcome to Windows 10!
As a precaution during wrap up, consider using the built-in Windows System Image Tool tucked away in the File History controls to back-up your new OS install to that second USB flash drive, so next time you install Win 10 it’ll take 10 minutes, instead of 45.

Otherwise, you're good to game. Make sure you've got the latest updates from Nvidiaor AMDinstalled, download Steam, and start queuing up some games.
Post a Comment